Rifle scope turret systems are all based around some of the most vital factors in successful hunting - distance and accuracy.
With target and ballistic turrets, you can place precise and accurate shots well past 1000 yards.
With an intimidating reputation, do these turrets hold up to their promise?
Let's get into what turret systems are and how they can improve accuracy, no matter the distance, in your next hunt.
What are Target Turrets?
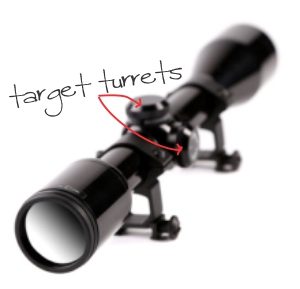
Target turrets are your external, raised knobs located at the beginning of the eye bell on the top and right side of the rifle scope.
These are called the windage and elevation knobs and they make adjustments.
Their objective is to change your bullet impact by using the reticle cross hairs to raise, lower, or move sideways for a true point of aim.
The turrets may or may not have distance markings on them.
More commonly than not, they rotate in MOA or Mrad clicks. A friction turret doesn't have the clicking mechanism. If you're curious about what a friction turret is, check out our Leupold Rifleman 4-12X40 Review.
How to Use Target Turrets
The physical use of target turrets is elementary in design. Here's a simple how-to to get you started.
Step 1:
Acquire the manufacturer recommended tool to rotate the turret. If it's a finger-adjustable turret, you already have the necessary tools - your thumb and index finger. Finger-adjustable is the most popular, easy to use, and most simplest way to make scope adjustments.
The next most common method is the coin-slot. You'll need to keep a coin, flat head screwdriver, or the tool that the manufacturer sent with the scope on you at all times to be able to make adjustments. Other turret constructions can be awkward and impractical. You might have to use a specialized tool to use it.
Step 2:
Using the appropriate adjustment tool, simply rotate in the direction you want to make the adjustment. For finger adjustable, just grab the turret and turn up or down. For the coin-slot style, use the tool to rotate it in the circular direction you want
Step 3:
Pay attention to the reticle so you'll know which way to rotate the turret. Don't leave your sight picture while making adjustments. Unsure what the sight picture is? This will guide help.
What to Look For in a Target Turret System
Here are some tips to remember when scrutinizing a potential buy to make using target turrets easy, simple, and smooth.
TIP 1
Look at how the turrets are turned. You might not want to deal with any special equipment while out in the field.
TIP 2
If you're using finger-adjustable turrets, you'd want to pay attention to the serrations or grooves in the knobs. The knurlier the design, the easier to grip and turn - perhaps even with gloves on.
TIP 3
Look at the quality of the rotational adjustments. What I mean by that is, are the clicks audible? You may like this, you may not. In close hunting ranges, it could give away your position. But, if you appreciate outward, obvious, and audible manifestations of working mechanisms, you might want a louder clicking turret.
Are the clicks positive? Positive in this case means crisp, sharp, and you can feel the cogs and gears moving in place.
TIP 4
Do you want exposed or capped turrets? Exposed turrets means that you'll have less components to keep track of and reference markings will always be visible. Capped turrets don't have any exposed components that can be corroded by weather and consequent rust.
TIP 5
If the turrets are resettable to zero, this is a bonus!
TIP 6
If you have a chance, research other hunters opinions on whether or not the scope will hold a zero during repeated and heavy recoil. If it doesn't you'll have you to re-zero your scope all over again. You may need to look at rifle scopes under $500 and up for this type of reliability.
What are Target Turrets Used For?
1. Sighting In
Target turrets are used for two things. The first is to sight in or zero your rifle scope to the rifle and ammunition you're using. Sighting in needs to be done every time you use a different type of bullet with the same scope and rifle.
If you're not quite sure what sighting in means or how to do it, here's a comprehensive step-by-step plan on how to sight in your new rifle scope and another on sighting in a rifle scope at 100 yards. With that to read over, you'll get a fully detailed look at everything that's involved with getting your scope into tip-top shape before you ever fire off a round. From focusing the diopter and bore sighting to zeroing your scope, you'll get everything you need to know.
But, for a simple and quick round-up of target turret use right now, I'll drop off a few sighting in tips for you to muse over.
Step 1
While at the range, your rifle needs to be kept in the exact same position with each and every shot to sight in. Use a gun vice or sand bags - whatever gets the job done.
Step 2
Aim for the bulls-eye and shoot.
Step 3
Ensuring the rifle is secured in the same and consistent spot, rotate the target turrets until the center of the cross hair is exactly, or as on point as possible, on the bullet strike of the first shot.
Step 4
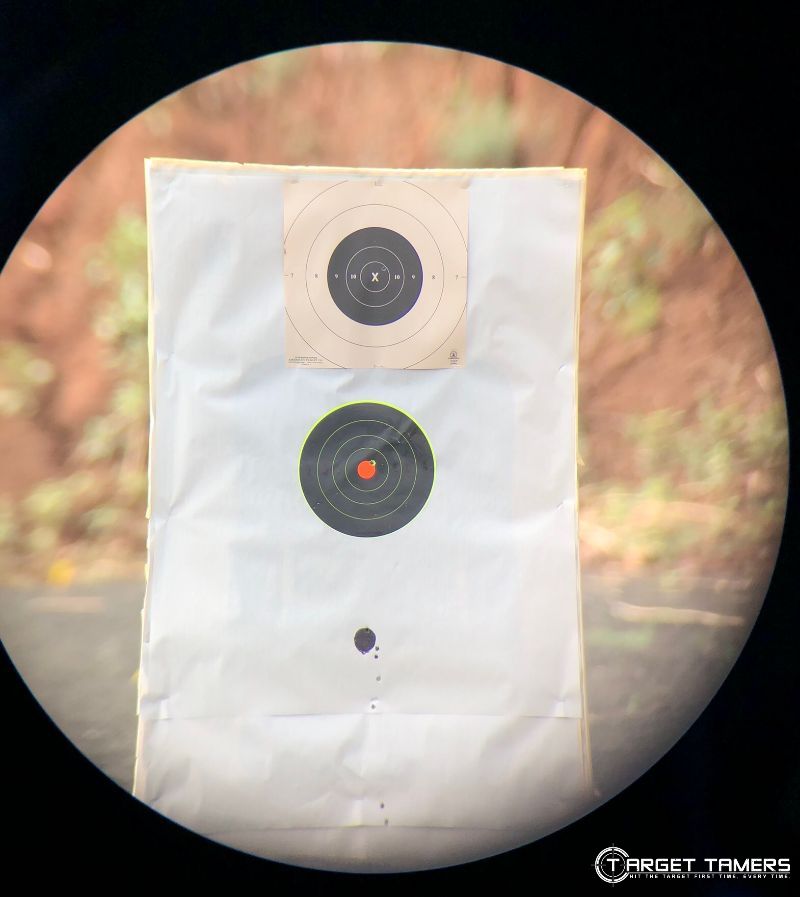
Aim for the bulls-eye and shoot.
You should now be sighted in. This distance that you just sighted in your scope for is usually 100 yards. If you're using ballistic turrets for very long distances, you may be sighting in at 200 yards. This is called your original zero. This brings us to discovering how to use features that reset back to zero that we will discuss in a minute. But first, let's briefly talk about the second use of the target turret system.
2. Bullet Drop Compensation
The further out you shoot, the more of an effect gravity, bullet velocity, bullet weight, rifle power, wind, and almost anything you can think of that has to do with shooting will affect where your bullet strike is.
Back with the old school ways, without telescopic technology like what we have today, long distance shots out to 300 yards or more was really just a guess at best. With so many factors coming into play as to where your bullet will actually strike the target, technology really has improved accuracy, preciseness, and the rules surrounding ethical hunting.
Ballistic reticles play a large part in compensating for bullet drop using the target turret system.
Here are some tips on what to look for in a ballistic reticle:
TIP 1
Determine what distances you think you need a ballistic reticle for. This can help you decide whether a basic or more complex and detailed ballistic reticle is appropriate.
TIP 2
For custom or extremely precise ballistic reticles, you could look into glass-etched for the most calibrated accuracy possible.
TIP 3
Research what type of markings you prefer on your ballistic reticle - hash marks, dots, or post points.
TIP 4
Determine what measurement system you want to use. The turret system will match the ballistic measurement system. So, if you like MOA adjustments, go with a scope measuring in MOA. If you like mil dot ballistic reticles, go with the Mrad turret system.
TIP 5
Remember that ballistic reticles work differently on SFP and FFP scopes. On a good FFP scope, the ballistic reticle can be used at any magnification. On more commonly used SFP scopes, the reticle can only be used at a predetermined magnification - almost always the highest power.
TIP 6
It's also important to remember that unless your trophy is conveniently grazing in the exact distance that's ideal for the appropriate point of aim on your ballistic reticle, you'll still have to holdover or under to get precisely on target.
How to Use the Turret System for BDC Adjustments
Each rifle scope will be different - even if the turret measurement system is the same i.e. 1/4 MOA clicks. Here's a brief how-to to get you started.
Step 1
Go to the rifle scope manufacturer's website to use their ballistic program. You can also sufficiently use the manufacturer recommended BDC reticle holdover chart for more generalized information.
Step 2
Identify your rifle scope and enter in the needed information about your bullet and hunting conditions. Then, ensure the calculator/tool has the right zero distance for your rifle and scope.
Step 3
Note down or print off the page that identifies the number of clicks that's needed to make the scope adjustments for each distance that you want.
Step 4
When you want to shoot out to 400 yards from 150 yards, you don't need to do any math or figuring out what the holdover is to be accurate. Your prep work has done the hard work for you.
Just make the number of clicks on the turret system then aim at the correct marking on the ballistic reticle to get dead on. When increasing your distance, you'll need to dial your turrets up. When decreasing your distance, you'll need to dial your turrets back down.
Step 5
Practice, practice, and practice some more at the range for maximum accuracy and user confidence.
How to Use Turrets to Reset Zero
This isn't always an aspect that rifle scopes have, but it's a super convenient feature that makes shooting a much more streamlined and pleasant experience.
Being able to reset zero means being able to go back to your original zero in a jiffy. This feature takes away the need for you to remember how many clicks you made or how far up you dialed to reverse the process and get back to zero.
While nearly all manufacturers have slightly different ways to mark your original zero, there is a stress-free, simple, fast, and popular way to do it.
TIP
While zeroing your scope, the turret system is going to be moved from its original spot. If it's got reference markings on it, this could probably confuse you even more. The goal is to manually set your zero as the default distance so you can return to it easily whenever you want.
Step 1
Sight in your scope.
Step 2
Once that's done, simply pull up or out the elevation turret. You might need to hold it to keep it out or it may click into this position for easy use.
Step 3
Turn the dial in the appropriate direction to match the 0 (zero) with the center line on the elevation turret. Push in or let go of the knob so that it reconnects with the turret system. You have now zeroed your scope for "x" distance.
Step 4
If your turret has revolution (rev) or rotation markings, take note what rev you're on to ensure you're at your original zero. A rev is a full turning of the turret in one full circle and the markings will typically be horizontal hash marks. So, not only does the 0 have to match the center line, it should also be on the right rev.
Step 5
To shoot further than your zero distance/original zero, you'll rotate the turret up. To shoot closer than your zero distance, you'll rotate the turret down.
Step 6
To get back to your original zero, you should be able to completely rotate the turret in one direction all the way until it stops at 0.
But, what about ballistic turrets? How do they work? And, isn't a ballistic reticle enough? Let's get your questions answered and your concerns addressed about this type of turret system next.
What are Ballistic Turrets?
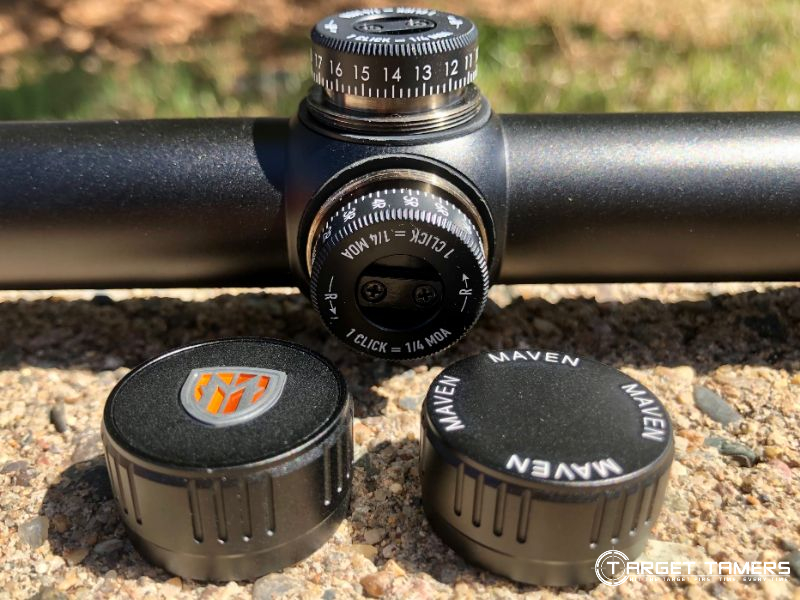
Ballistic turrets are large and over-sized components that sit on top of the elevation turret. It has distance markings on it, usually in 100 yard increments, for easy reference and simple use. It enables you to compensate for bullet drop from known distances.
Features of a Ballistic Turret
Here are some things to look out for when considering a ballistic turret.
TIP 1
The numerical references on the turret will indicate distance capacity. Ex. 20 may mean you can range out to 2000 meters, 16 may mean you can range out to 1600 yards.
TIP 2
The lines represent the measurement increments. On a 1/4 MOA turret, there will typically be a longer more distinct line with a number that indicates the distance. These numbered markings are usually in twos to reduce a cluttered look on the turret. Making clicks from one number to another is equivalent to 1 MOA. In between these distance markings will be three smaller lines indicating the 1/4 minute clicks.
To bring this into an example: if the center line is matched up with the second small line in between the 6 and the 7, it's said as 6 MOA and/plus two clicks. You could also say 6 1/2 MOA.
TIP 3
Some rifle scopes give you the ability to set more than one zero with extra components on the turret. Check out these Swarovski scopes for a streamlined, easy to use, and cutting edge ballistic turret. The Leupold VX-6 4-24X52 also surpassed our ballistic turret expectations.
TIP 4
You can have your ballistic turret custom made for your bullet and rifle specifications. Both Leupold and Swarovski dabble in the custom ballistic turret market.
To have your turret outfitted for you, just send in what zero distance you want, all the usual bullet specifications (pretty much all the information you would put into a ballistic program), and even better, give them the number of clicks it takes to get from your zero to an ever further distance.
This would be like having your scope and rifle zeroed for 200 yards and then making 55 clicks to get dead on at 600 yards.
With all of this intimate information, you can have a fully calibrated turret for your exact ammo and rifle. On the flip side, if you were to change anything about the shooting variables such as the bullet, the scope, extreme elevation and wind changes, and more, your ballistic turret will be unusable.
TIP 5
Having a complete and fully integrated windage feature is a bonus, but it's not necessary.
Pros and Cons of Ballistic Turrets
Pros:
- Very easy and simple to use - just turn the dial to the distance your target is in and shoot
- Can work with any magnification
- Designed for extreme long range shooting
- Allows for multiple zeros
- Takes holdovers and bullet drop out of the equation
- Custom make dials for specific loads
- More precise and finer accuracy
- Has zero stop features
- Perfect tool to use with a laser rangefinder
Cons:
- Requires added set up, time, and practice to know how to use correctly
- Can encourage misplaced shots in poor conditions
- Extremely more expensive than conventional rifle scopes
- More costly than a ballistic reticle
- Custom-made makes turret useless if you change any variable in your scope, ammo, and hunting conditions
Go Forth Turret Master
Becoming a master at long distance shooting is never going to be a destination. It's always going to be a journey to properly maintain and hone your skills.
Turret systems have been designed to help maximize not only your enjoyment, but your accuracy. While they can be intimidating to look upon, they'll certainly grow on you as you get intimate with it at the range. You might not be able to go without again.
Now You Know About TURRET SYSTEMS, Check Out Our RETICLE Guide
Further Reading


Excelente presentación y análisis
Gracias!